Press the “Open Folder” button in the sidebar, or the Open folder… link in the Welcome page. Both will trigger the file picker view. Choose one folder where you have source code, or even just text files, and open it.
VS Code will show that folder content in your view:
On the right hand side, the empty view shows some commands to perform some quick operations, and their keyboard shortcut. If you select a file on the left, that file will open on the main panel: Once you start editing it, you’ll notice a dot will appear next to the file name in the tab, and in the sidebar as well: Pressing CMD+P will show you a quick file picker to easily move in files on large projects: You can hide the sidebar that hosts the file using the shortcut CMD+B.
The second icon in the toolbar is “Search”. Clicking it shows the search interface: You can click the icons to make the search case sensitive, to match whole words (not substrings), and to use a regular expression for the search string. To perform the search, press enter. Clicking the ▷ symbol on the left enables the search and replace tool. Clicking the 3 dots shows a panel that lets you just include some specific kind of files, and exclude other files:
Source Control
The Source Control tab is enabled by clicking the third icon in the toolbar.
Git & Visual Studio Code
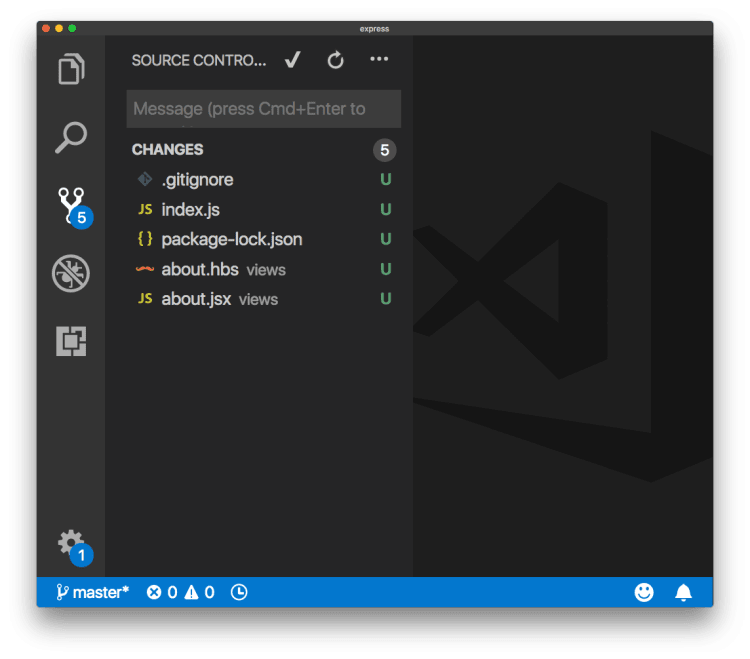
Visual Studio Code includes integration with Git out of the box. In this case the folder we opened does not have source control initialized. Clicking the first icon on top, with the Git logo, allows us to initialize the Git repository: The U beside each file means that it’s been updated since the last commit (since we never did a commit in the first place, all files are updated). Create the first commit by writing a text message and pressing Cmd-Enter, or clicking the ✔︎ icon on top. I usually set this to automatically stage the changes when I commit them. The 3 dots icon, when clicked, offers lots of options for interacting with Git: Git Repo Initialized
Debugger
The fourth icon in the toolbar opens the JavaScript debugger.This deserves an article on its own. In the meantime view out the official docs.
Extensions
The fifth icon brings us to extensions. Extensions are one great feature of VS Code. They can provide unlimited value that you’ll definitely end up using many of them. I have many extensions installed. Remember that every extension you install is going to somewhat impact the performance of your editor. You can disable an extension you install, and enable only when you need it. You can also disable an extension for a specific workspace (we’ll talk about work workspaces later). For example, you don’t want to enable the JavaScript extensions in a Go project. There is a list of recommended extensions, which include all the most popular tools. If you need to edit markdown files for something like Github, VS Code automatically suggests the MarkdownLint extension, which provides linting and syntax checking for Markdown files. As an example, let’s install it. First, we’ll inspect the number of views. It’s 1.2 million – ton! And the reviews are positive (4.5⁄5). Clicking the extension name opens the details to the right. Pressing the green Install button starts the installation process, which is straightforward. It does everything for you, and you just need to click the “Reload” button to activate it, which effectively reboots the editor window. Done! Let’s test it by creating a markdown file with an error, like a missing alt attribute on an image. It successfully tells us so: Down below we introduce some popular extensions you don’t want to ignore, and some of the extensions that I use frequently.
The Terminal
VS Code has an integrated terminal. You can activate it from the menu View ➤ Integrated Terminal, or using CMD+\` and it’ll open with your default shell. This is very convenient because in modern web development you almost always have some npm or yarn process running in the background. You can create more than one terminal tab, and show them one next to the other, and also stack them to the right rather than in the bottom of the window:
The Command Palette
The Command Palette is an extremely very powerful tool in your arsenal. You can enable it by clicking View ➤ Command Palette, or using CMD+SHIFT+P A modal window will appear at the top, offering you various options, depending on which plugins you have installed, and which commands you used last.
Common operations to perform are:
Extensions: Install Extensions
Preferences: Color Theme to change the color theme (I prefer a darker theme)
Format Document – which formats code automatically
Run Code – which is provided by Code Runner, and executes the highlighted lines of JavaScript
you can activate any of those by starting typing, and the autocomplete functionality will show you the one you want. Remember when you typed CMD+P to see the list of files, before? That’s a shortcut to a specific feature of the Command Palette. Here are others:
Ctrl-Shift-Tab shows you the active files
Ctrl-G opens the command palette to let you enter a line number to go to
CMD+SHIFT+Oshows the list of symbols found in the current file
What symbols are is dependent on the file type. In JavaScript, those might be classes or functions. In Markdown, section titles.
Themes
You can switch the color theme used by clicking CMD-k + CMD-t, or by invoking the Preferences: Color Theme command. This will display the list of themes installed: you can click one, or move with the keyboard, and VS Code will show you a preview. Click enter to apply the theme:
Customization
The Theme is just one customization you can make. Sidebar icons that are assigned to a file are also a big part of a great user experience. You can change those by going to Preferences ➤ File Icon Theme. The Ayu theme comes with its own icons theme, which perfectly matches the theme colors: All the customizations we’ve made so far, the theme and the icon theme, are saved to the user preferences. Go to Preferences ➤ Settings (also reachable via CMD-,) to see them: The view shows the default settings on the left, for an easy reference, and the overridden settings on the right. You can see the name of the theme and the icon theme we set up, in workbench.colorTheme and workbench.iconTheme. I zoomed in using CMD-+, and this setting was saved as well to window.zoomLevel, so the next time VS Code starts up, it remembers my choice for zooming. You can decide to apply some setting globally, in User Settings, or relative to a workspace, in Workspace settings. Most of the times these settings are automatically added by extensions or by the VS Code itself, but in some cases you’ll directly edit them in this place.
Workspaces
User settings can be overridden in Workspace settings. They take precedence, and are useful for example when you use a project that has linting rules different from all the other projects you use, and you don’t want to edit your favorite settings just for it. You create a workspace from an existing project by clicking the File ➤ Save Workspace as… menu. The currently opened folder will be enabled as the workspace main folder. The next time you open VS code, or you switch project, instead of opening a folder, you open a workspace, and that will automatically open the folder containing your code, and it will remember all the settings you set specific to that workspace. In addition to having workspace-level settings, you can disable extensions for a specific workspace. You can just work with folders until you have a specific reason for wanting a workspace. One good reason is the ability to have multiple, separate root folders. You can use the File ➤ Add Folder to Workspace to add a new root folder, which can be located anywhere in the filesystem, but will be shown along with the other existing folder you had.
Editing
How to edit in Visual Studio Code shown below.
Errors & Warnings
When you open a file you will see on the right a bar with some colors. Those colors indicate some issues in your code. For example here’s what I see right now:
Visual Studio Command Line
When you install VS Code, the code command is available globally in your command line. This is very useful to start the editor and open a new window with the content of the current folder, with code..
-n
will create a new window. A useful thing that’s not always knows is that VS Code can quickly show the diff between two files, with code
--diff file1.js file2.js.
Solving High Usage CPU Issues
When running into an issue of high CPU usage, and spinning fans, with a project with lots of files under node_modules.. We’ll include this configuration and things will be normal again:
 Once you’ve completed the download, you should see the welcome screen image featured below.
 The 5 icons on the left toolbar give you access to:
 Press the “Open Folder” button in the sidebar, or the Open folder… link in the Welcome page. Both will trigger the file picker view. Choose one folder where you have source code, or even just text files, and open it.
 On the right hand side, the empty view shows some commands to perform some quick operations, and their keyboard shortcut. If you select a file on the left, that file will open on the main panel:
  Once you start editing it, you’ll notice a dot will appear next to the file name in the tab, and in the sidebar as well:
  Pressing CMD+P will show you a quick file picker to easily move in files on large projects:
  You can hide the sidebar that hosts the file using the shortcut CMD+B.
 You can click the icons to make the search case sensitive, to match whole words (not substrings), and to use a regular expression for the search string. To perform the search, press enter. Clicking the ▷ symbol on the left enables the search and replace tool. Clicking the 3 dots shows a panel that lets you just include some specific kind of files, and exclude other files:

 The U beside each file means that it’s been updated since the last commit (since we never did a commit in the first place, all files are updated). Create the first commit by writing a text message and pressing Cmd-Enter, or clicking the ✔︎ icon on top.
  I usually set this to automatically stage the changes when I commit them. The 3 dots icon, when clicked, offers lots of options for interacting with Git:
 Extensions are one great feature of VS Code. They can provide unlimited value that you’ll definitely end up using many of them. I have many extensions installed. Remember that every extension you install is going to somewhat impact the performance of your editor. You can disable an extension you install, and enable only when you need it. You can also disable an extension for a specific workspace (we’ll talk about work workspaces later). For example, you don’t want to enable the JavaScript extensions in a Go project. There is a list of recommended extensions, which include all the most popular tools.
  If you need to edit markdown files for something like Github, VS Code automatically suggests the MarkdownLint extension, which provides linting and syntax checking for Markdown files. As an example, let’s install it. First, we’ll inspect the number of views. It’s 1.2 million – ton! And the reviews are positive (4.5⁄5). Clicking the extension name opens the details to the right.
  Pressing the green Install button starts the installation process, which is straightforward. It does everything for you, and you just need to click the “Reload” button to activate it, which effectively reboots the editor window. Done! Let’s test it by creating a markdown file with an error, like a missing alt attribute on an image. It successfully tells us so:
  Down below we introduce some popular extensions you don’t want to ignore, and some of the extensions that I use frequently.
 This is very convenient because in modern web development you almost always have some npm or yarn process running in the background. You can create more than one terminal tab, and show them one next to the other, and also stack them to the right rather than in the bottom of the window:
 you can click one, or move with the keyboard, and VS Code will show you a preview. Click enter to apply the theme:
 All the customizations we’ve made so far, the theme and the icon theme, are saved to the user preferences. Go to Preferences ➤ Settings (also reachable via CMD-,) to see them:
  The view shows the default settings on the left, for an easy reference, and the overridden settings on the right. You can see the name of the theme and the icon theme we set up, in workbench.colorTheme and workbench.iconTheme. I zoomed in using CMD-+, and this setting was saved as well to window.zoomLevel, so the next time VS Code starts up, it remembers my choice for zooming. You can decide to apply some setting globally, in User Settings, or relative to a workspace, in Workspace settings. Most of the times these settings are automatically added by extensions or by the VS Code itself, but in some cases you’ll directly edit them in this place.
 When you open a file you will see on the right a bar with some colors. Those colors indicate some issues in your code. For example here’s what I see right now: